Before you panic, know this first–negative doesn’t mean bad.
With design, negative space is the white area or empty space around the subject of your artwork. By learning how to erase in digital design, you'll create better quality work.
In this article we’ll explore why negative space matters. Plus, you'll discover how to use specific editing tools to elevate your art. You’ll learn how to erase in Canva and discover how to do the same in Imagewith.Ai, a seamless alternative. (Spoiler alert: Imagewith.Ai is cheaper–and better).
By the end of this guide, you’ll know how to erase backgrounds and remove unwanted objects in your designs. Before you know it, you'll be a pro at manipulating negative space. And you'll only have positive things to say about how it's done.
Table of Contents
- What is Negative Space?
- How to Erase in Canva
- Removing Unwanted Objects in Canva
- Erasing Backgrounds in Canva
- What to Consider Before Using Canva
- Imagewith.AI: An Effortless Alternative
- ImageWith.AI ClearOff and Outcut: Seamless Editing Tools
- Closing Thoughts
What is Negative Space?
For my first figure drawing class in art school, my instructor pointed at the model and told us to look past her. I had no idea what she meant. ‘Don’t look at her body–look at the space around it.’
Imagine the way a shoulder curves above a collar bone. Picture where the sharp edge of a fingernail meets the round bulb of a thumb. That’s negative space. Now of course if you’re looking at a 2-dimension piece of artwork, it’s a little different.
In most design softwares, you’re likely creating on a white or a transparent background. The white or empty area around the subject is your negative space.
Negative space is everyone. You can find it in logos for your business, the baby shower invite you're making, or in that photo you're editing.
By manipulating the background of your design, you can create artwork with meaning.
Negative space is as crucial as the positive space, the subject. There are certain tools in editing that make it easy to make the best use of negative space. You can remove unwanted elements or delete your background. Doing this will put the focus on your subject.
Having the right tools to do this is key. Once you figure it out, you can communicate better with your intended audience.
So let’s learn how to do just that!
How to Erase in Canva to Improve Your Design
Canva is a popular graphic design platform for newbies and professional designers alike. It's great for creating visual content like logos, social media graphics, and business cards and offers image editing tools to improve your designs.
Removing Unwanted Objects in Canva
Negative space isn’t a black hole of nothing. In art, what you don’t see is just as important as what you do. If you have unnecessary elements in your artwork, your viewer might get distracted from the purpose of your piece.
Quality editing can improve your image, create an emotional impact, and remove clutter.
So can you erase part of an image in Canva? Yep!
To make the best of the negative space in your design, you can start by removing unwanted objects using Canva’s Magic Eraser tool.
In Canva, the steps are pretty simple.
- 1. Select the magic eraser tool from the photo editor.
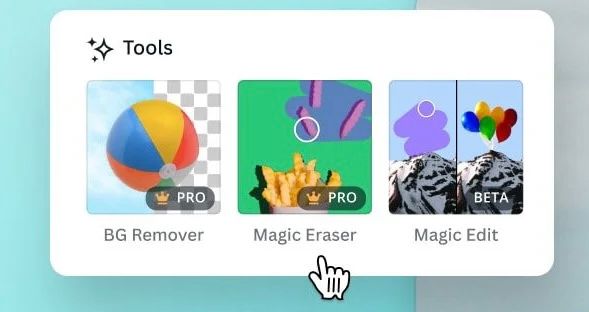
- 2. Adjust your brush size.
- 3. Brush over the object.
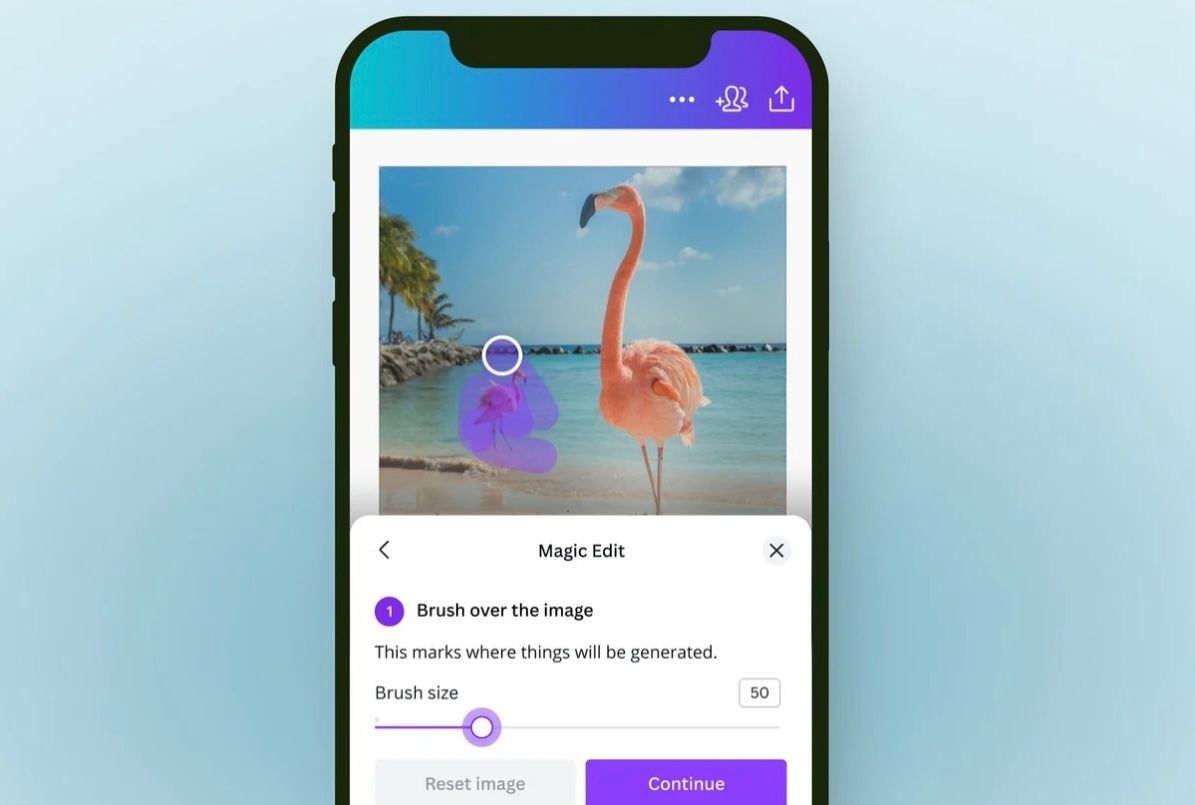
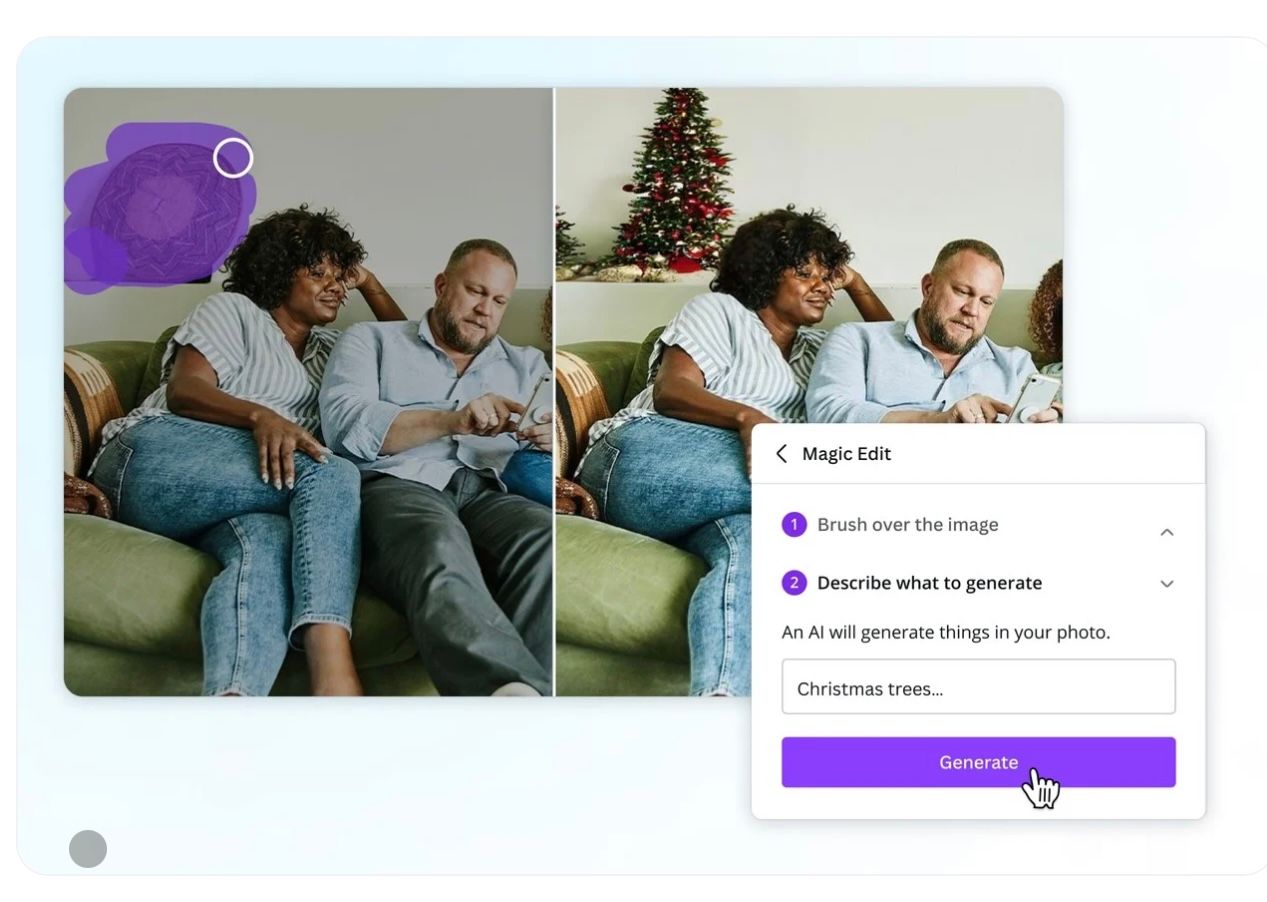
- 4. Click–and watch the magic of Artificial Intelligence do the work for you.


Robots haven’t taken over the world yet, but they’re definitely making creating art easier.
But what if it’s the entire background you want to erase?
Erasing Backgrounds in Canva
With Canva’s background remover tool you can delete the background of your design. This will allow you to isolate and focus totally on the subject.

-
1. Click on edit image in the top toolbar.
-
2. Select ‘background remover.’
-
3. Press ‘erase.’
-
4. If you’re satisfied with the result, hit ‘apply’ to save your changes.
A couple things to note. In Canva, you can only remove backgrounds from a video if its original length is under 90 seconds. On Canva mobile, the background remover tool is under ‘Effects.’
What to Consider Before Using Canva
Canva may have popularity, but is it the best tool on the market?
Let’s explore some of the pros and cons of Canva and consider why you may want to check out some quality alternatives.
Pros of Canva
User-Friendly Setup
Canva is easy to understand and is great for newbies and advanced designers alike.
Free Version
While Canva has a Pro paid version, it also offers many features for free, making it great for creators on a budget.
Templates
If you’re unsure where to start, Canva offers pre-designed templates. You can find everything from flyers to posters to business cards.
Cons of Canva
Template Limitations
There's a limited amount of templates and features. More experienced designers may find Canva doesn't offer enough options.
Limit on Exports
Canva’s free version limits how you can download the files and often sacrifices the quality.
Erasing is only available in Pro Version
Canva’s magic eraser tool and background remover tool is only available in Canva Pro, a premium paid version.
Obviously, the biggest issue here is that Canva’s free version doesn’t offer the ability to edit images. You'll need to pay to remove the background or take out unwanted elements. Meaning if you’re trying to do even basic editing, you’ll need to shell out for Canva Pro at $14.99 a month or $119.99 a year.
So what other softwares are out there?
Imagewith.AI: An Effortless Alternative
Imagine an editing software where with the click of a button, you get exactly what you need. That’s what Imagewith.Ai offers with their ClearOff and Outcut features in ImageWith.AI.
The imaging editing software is great for both beginners and advanced professionals, offering features that are great for navigating the world of negative space.
ClearOff and Outcut in ImageWith.AI: Effortless Alternatives
Imagewith.AI’s offers two great features to edit your images. The ClearOff feature removes unwanted objects, while the Outcut feature deletes backgrounds. All with just the click of a button.
Unlike Canva, using ImageWith.AI ClearOff and Outcut is really that simple.
Are you unsure what objects to delete? Both Canva's Magic Eraser tool and Imagewith.AI’s ClearOff feature use Artificial Intelligence to get the job done. But only ClearOff takes it to the next level.

ClearOff picks what elements to remove for you, taking the guesswork out of the equation. Beginners won’t need to wonder if they made the right choice. Plus, it speeds up the process. This is a great advantage for seasoned artists who produce large batches of designs.

With art, time is often as valuable as the quality of the design.
The steps are so simple, in fact, I don't need to list them. Upload the photo and press a button.
And if you thought it couldn’t get better, then think again.
Remember that pesky Canva con? You know, the whole part where you have to pay to erase your background or remove unwanted parts?
Imagewith.Ai offers a free versionthat actually gets the job done. You can edit five free images a day, remove objects and text and enhance and sharpen your image. Imagewith.Ai also has an Overscale feature that enhances and sharpens images.
Closing Thoughts
In many ways, Canva spreads itself too thin with its vast amount of features. Imagewith.AI is a straightforward tool with one specific job: edit your photo and keep the quality.
And if you find that you like the tool, then you can pay for monthly credits to continue your photo editing journey. Prices start as low as nine dollars a month.
There are different plans depending on the intensity of your demand. You can even buy extra credits on top of that. Plus, you can downgrade, upgrade, or cancel at any time.
Imagewith.Ai’s ClearOff and Outcutare top quality image editing tools. In no time, you’ll be a pro at manipulating negative space in your design. And well, there’s really nothing negative to say about that.


