Do you have a beautifully taken photo but shadows are ruining the composition? If you want to remove shadows but don’t know how, we have a great guide for you.
Shadows add texture, shape, and depth to an image, but if it’s distracting or command too much attention, they can alter the balance and focal point of your picture. And in such cases, it’s only normal you’d want to remove them.
However, if you’re not familiar with using photo editing software, you might find it challenging to do so. Don’t worry, in this article, we’ll show you how to remove shadows with Photoshop, using four methods that are quick to use, and easy to learn.
When Do You Remove Shadows from a Photo?
Shadows are essential for the proper balance of photo composition. While light brings brightness to an image, shadows add drama. For a photo to be great, there must be a good balance between the two.
But when shadows create inconveniences or obscure your intended subject, you may want to remove it from the image.
Here are three instances where shadows can cause an imbalance in a photo:
1 . Severe Shadows
Severe shadows appear when there is a harsh contrast between the light and dark colors in an image. Unless you intend to achieve this effect, the shadows may be too distracting for the viewer.
To remedy severe shadows, you may want to soften them to create a better balance in your image.
2 . Distracting Shadows
Distracting shadows can be anything you didn’t intend to put on your photo. This could be a shadow of yourself within the photo, shadows at the back of your subject that create overwhelming shapes, or shadows that darken your intended subject, such as shadows on a face.
Any shadow that appears on your image that’s unintended can draw the viewer’s eye away from the main subject, defeating the purpose of having a focal point in your image.
For example, you have a picture of a product on the left side of a photo, but shadows fill up over half of the image on the right side. In this case, you may want to remove the shadow from the photo, or soften it to make it less distracting.
3 . Shadows Causing Asymmetry
As mentioned earlier, light and dark colors in an image must be balanced to achieve a great photo. But when shadows overpower your image by being too dark, too big, or too distracting, you need to remove or lighten them to improve your image.
To iterate, a well-composed photo should have a good balance between brightness and darkness.
Whether your photo has any of these kinds of shadows or you simply don’t want to have them in the frame, it is possible to remove them using photo editing software like Photoshop.
Four Methods to Learn How to Remove Shadows with Photoshop
Photoshop is an excellent tool for removing shadows from images, with a wide range of options depending on how you want your photos to appear.
For this guide on how to remove shadows with Photoshop, we chose 4 different methods that are easy to learn, quick to do, and simple to use.
Here are four methods to remove shadows with Photoshop:
Using Photoshop’s Clone Stamp Tool
The Clone Stamp Tool is great for removing unwanted objects in a photo or for duplicating an area of an image to another spot. The tool copies the details of one part and transfers it to another.
To remove shadows, you simply click the background area beside the shadow and brush it over with the Clone Stamp Tool.
Here are the steps:

Step 1: Open the image.
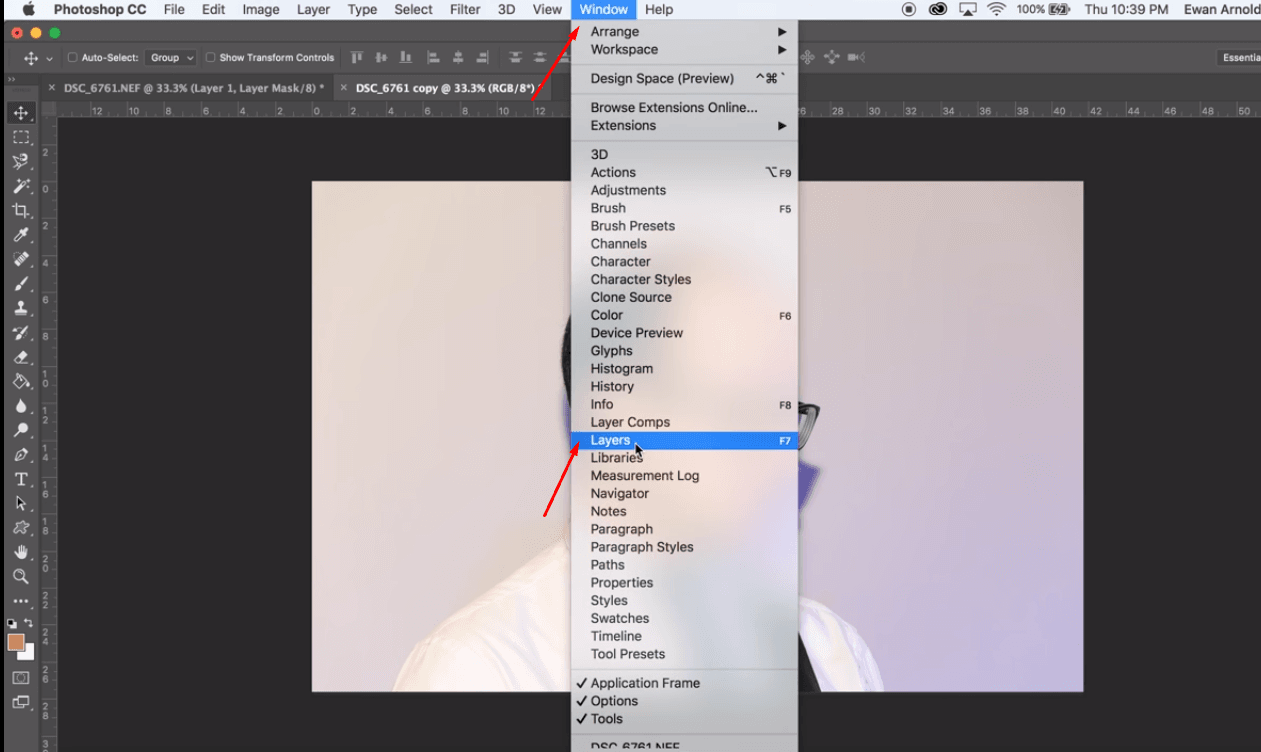

Step 3: Duplicate the image by creating another layer. Creating another layer of your image ensures you still have the original image, in case you make a mistake on your edits.
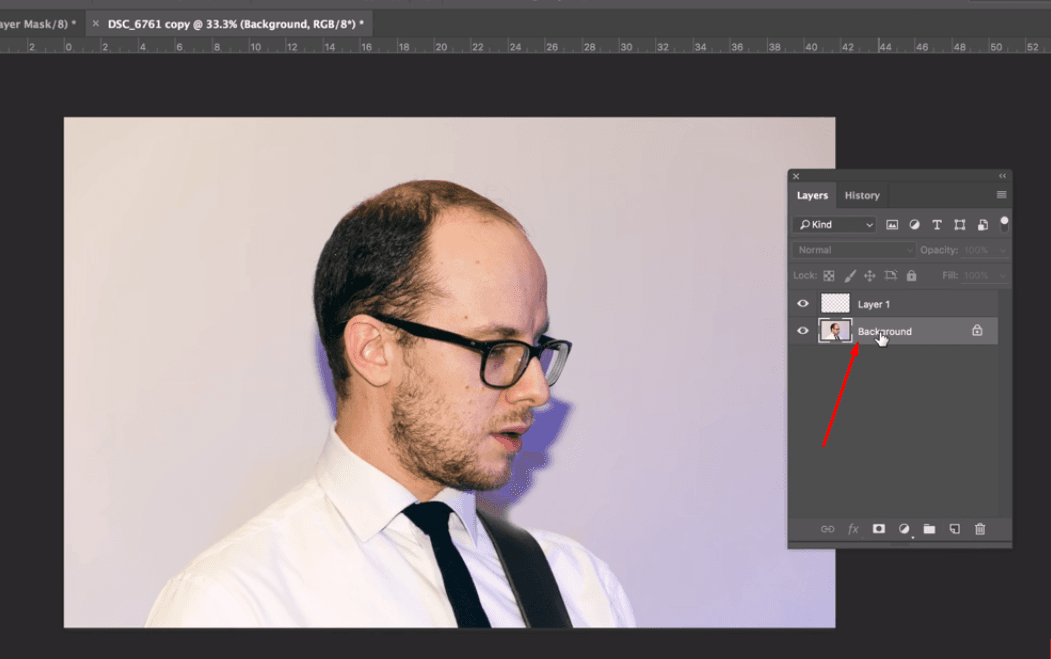
The “Background” thumbnail image is the original photo while the “Layer 1” is the duplicate. You’ll be editing the “Layer 1” image.
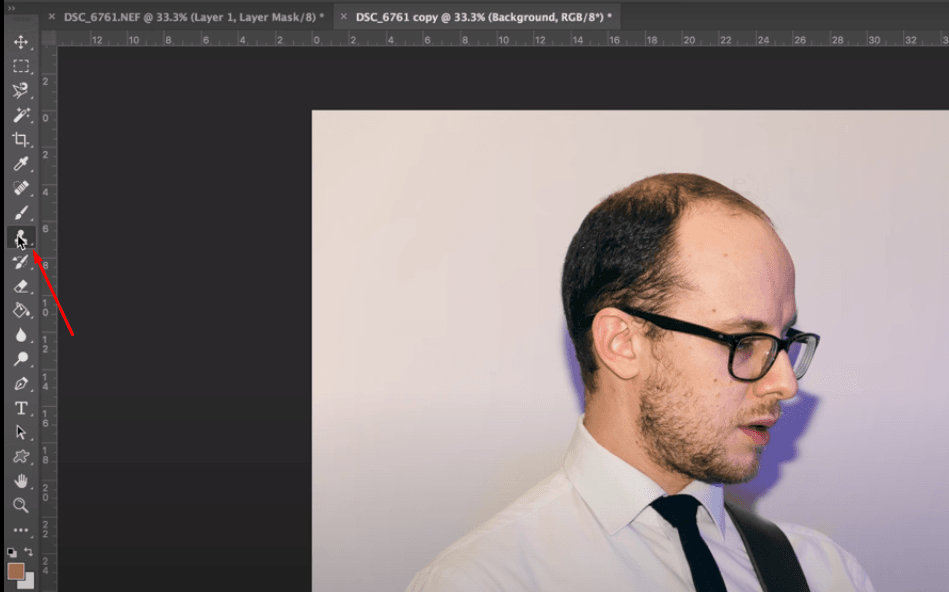
Step 5: Go to the left side of the screen and find the “Clone Stamp Tool” icon and click.

Step 6: Start brushing over the shadows.

Continue brushing over the shadows carefully.

This is how it will look when you’ve removed the shadows from the image. However, you may see that some edges of the subject have been damaged.
To fix this issue, we will continue using the Clone Stamp.

Step 7: Look for “Opacity” in the Layers panel. Slide over to increase the opacity percentage to have a soft view of the affected areas.
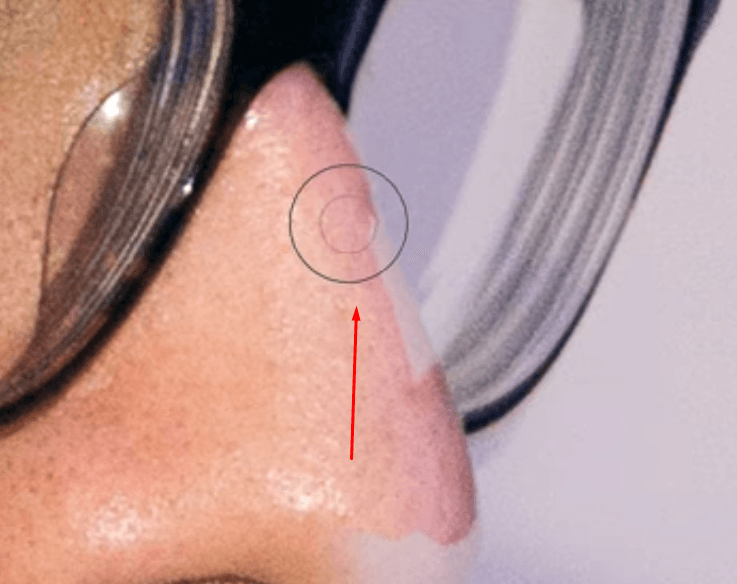
Step 8: Brush over the lightened edges of the affected areas with the Clone Stamp Tool to remedy the issues.

Once you’re done removing the shadows and fixing the damaged edges of the subject, it should look like this.
In summary, here are the steps to removing shadows in an image using Photoshop’s Clone Stamp Tool:
- Open the image.
- Make a duplicate layer.
- Click on Clone Stamp Tool.
- Brush over the shadows.
- If edges of the subject are affected by the Clone Stamp Tool, increase opacity.
- Brush over the edges with the Clone Stamp Tool to fix.
You can learn more about the detailed Clone Stamp Tool tutorial by watching this YouTube video.
[Photoshop Tutorial: How to Quickly and Easily Remove Shadows From Your Photos
](https://www.youtube.com/watch?v=tg8TSOeCsOA)
Using Photoshop’s Content Aware Fill
The Content Aware Fill feature is a powerful and advanced tool that removes unwanted elements in an image and fills the affected area with an image of the surrounding area.
Here are the steps to removing shadows using Photoshop’s Content Aware Fill tool:
Step 1: Open the image.
Step 2: Make a duplicate (refer to the Clone Stamp Tool instructions)
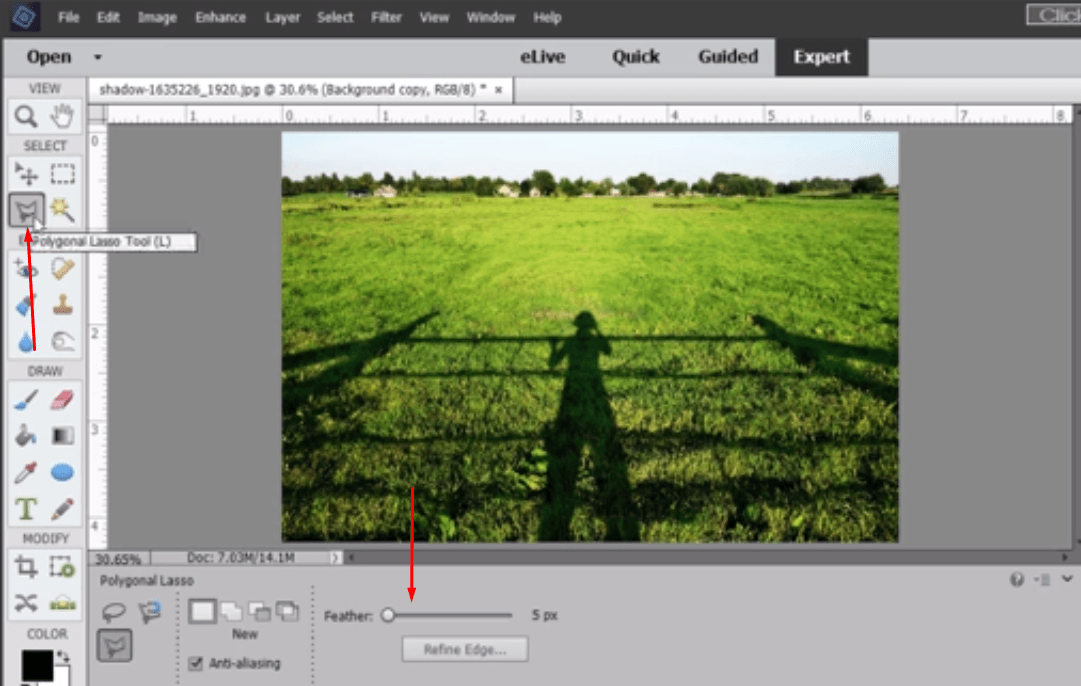
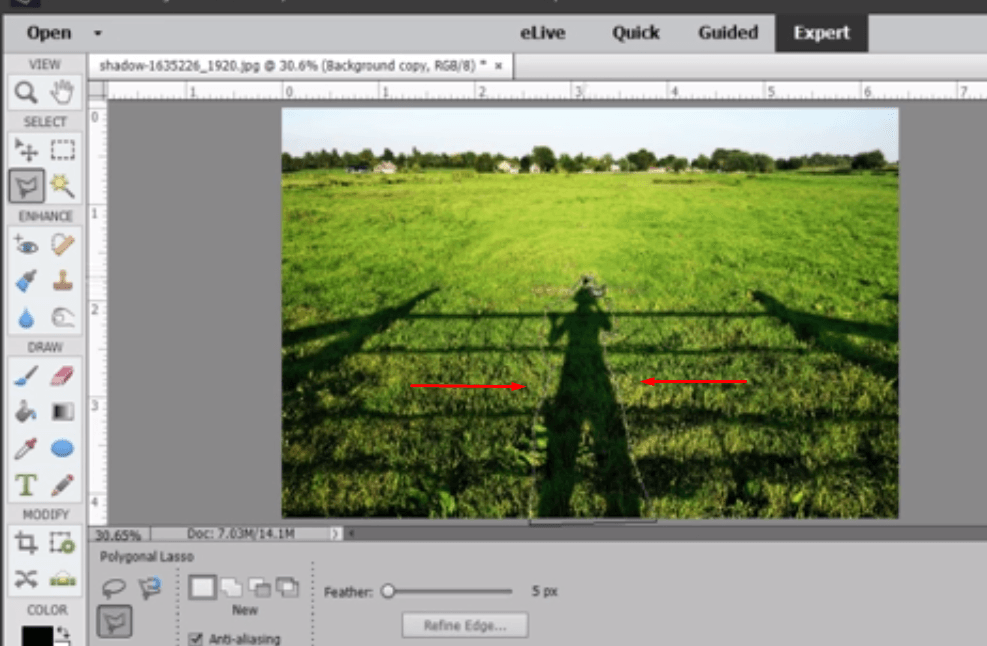
Step 4: Using the “Lasso Tool,” manually trace the shape of the shadow you want to remove.

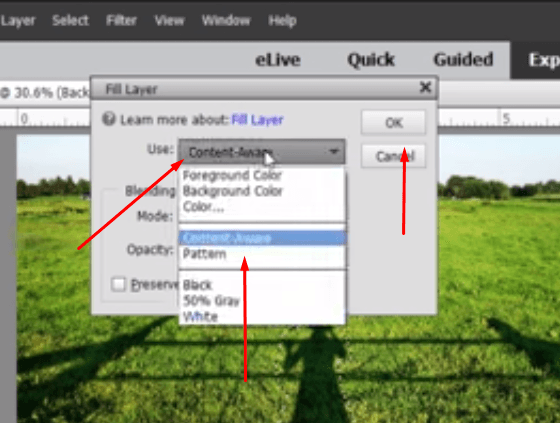
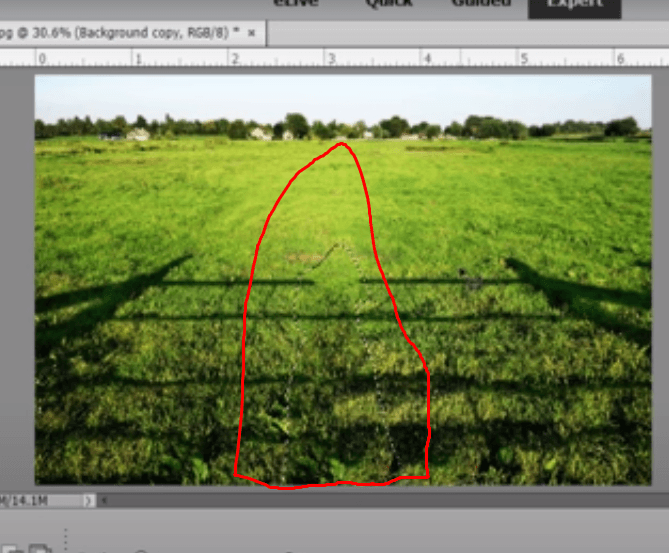
Once you click on “OK,” Photoshop will then remove the shadow, and it will look like this.
In summary, here are the steps to removing a shadow on an image using the Content-Aware Fill tool in Photoshop:
- Open an image.
- Duplicate a layer.
- Click on the “Lasso Tool.”
- Manually trace the shadow you want to remove.
- Click on “Edit,” followed by “Fill Selection” in the drop-down menu.
- Click on “Content-Aware” in the dialogue box, and click “OK.”
For more details on this Content-Aware Fill tutorial to remove shadows from an image, you can watch this YouTube video.
How You Can Remove Shadows with Photoshop Elements Content Aware Fill
Using Photoshop’s Auto Mask
Photoshop’s Masking feature allows you to adjust the visibility of objects in an image, such as shadows. Typically, it is used to remove objects on the background of a photo, but you can use it to remove shadows.
Here are the steps:
Step 1: Open an image.
Step 2: Make a duplicate layer (refer to Clone Stamp Tool instructions).
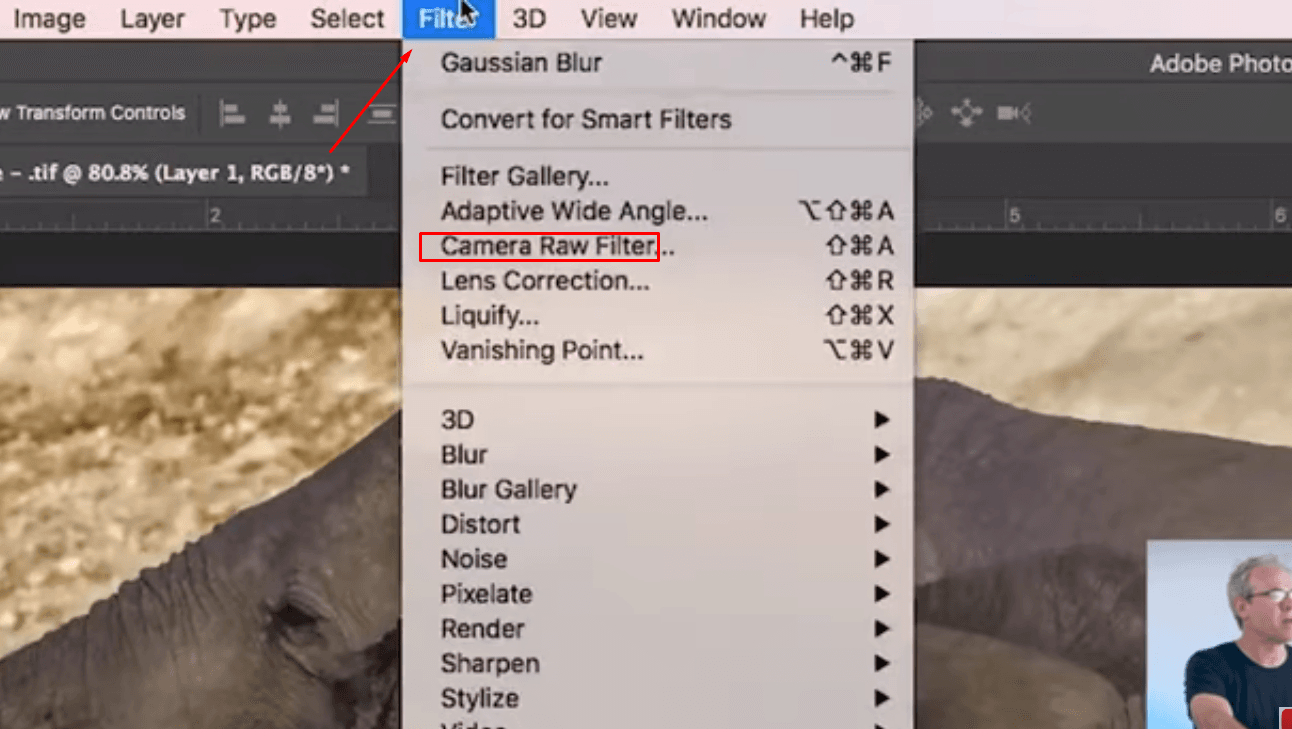
Step 3: Click on “Filter” on the upper toolbar, and click on “Camera Raw Filter” in the drop-down menu.
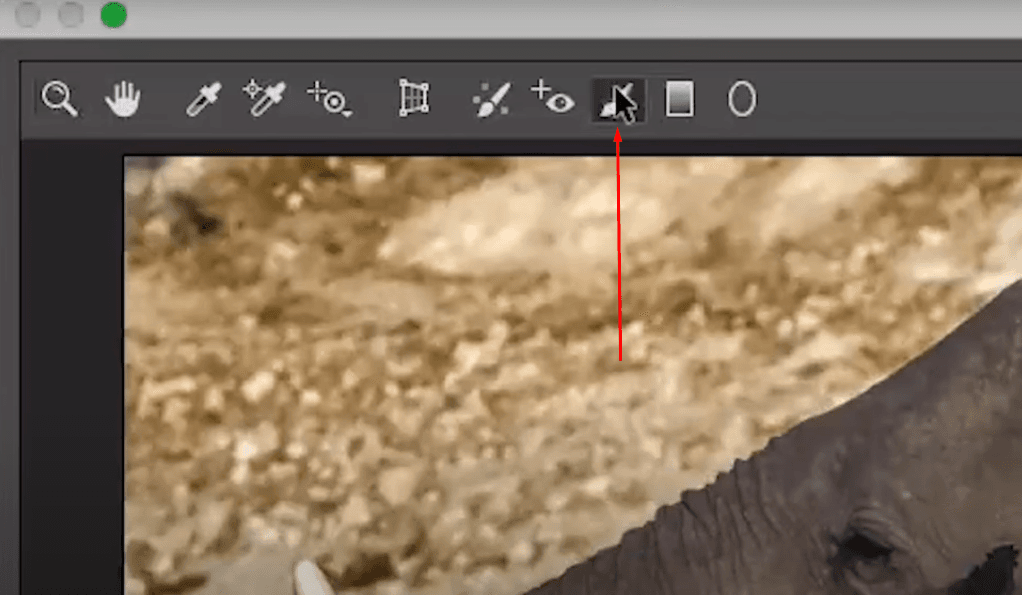
Step 4: Look for the “Adjustment Brush” icon and click.
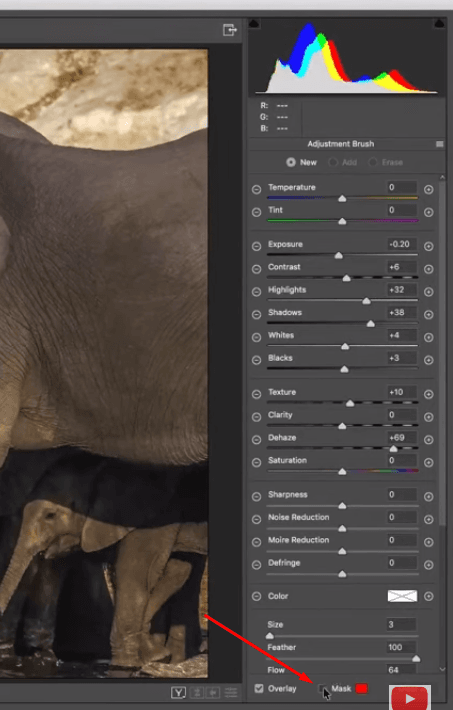
Step 5: A dialogue box will appear on the right side of the screen where you can adjust a range of features. Click “Mask,” which is found on the bottom part of the box.
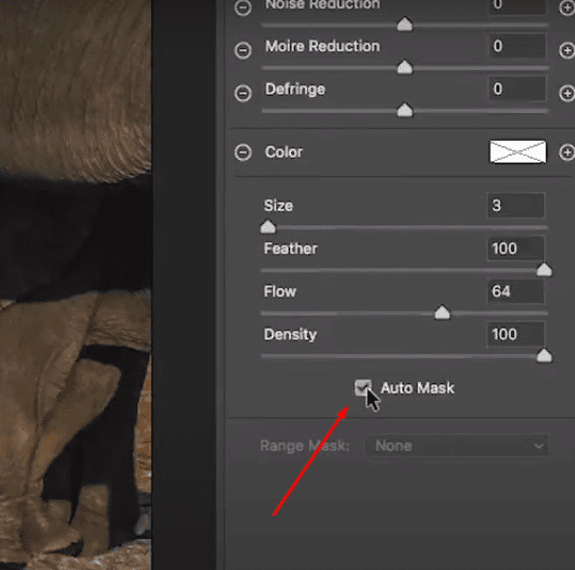
Step 6: Further below the dialogue box, click on “Auto-Mask,” which will help select the area you want to remove.
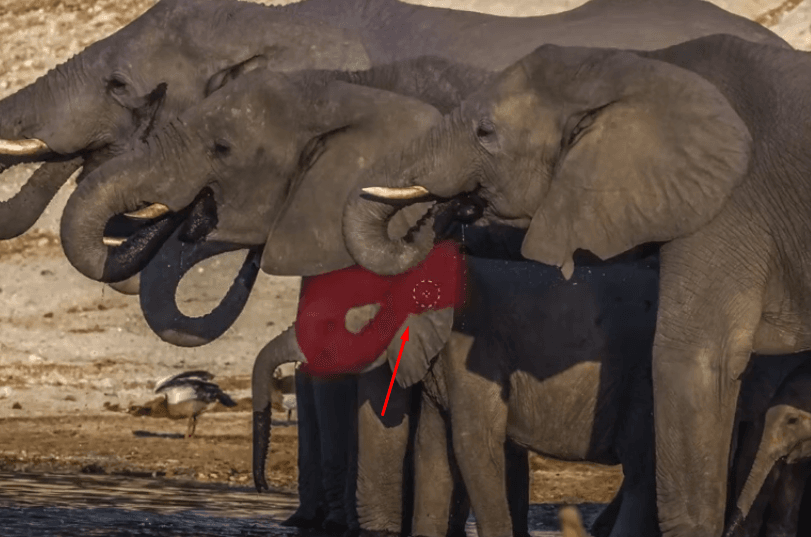
Step 7: Start brushing over the shadows in your photo. Once you’ve brushed over the shadows you want to remove, go back to the Adjustment Brush panel and click on “Mask” to unmask, and you can now see your selected area.
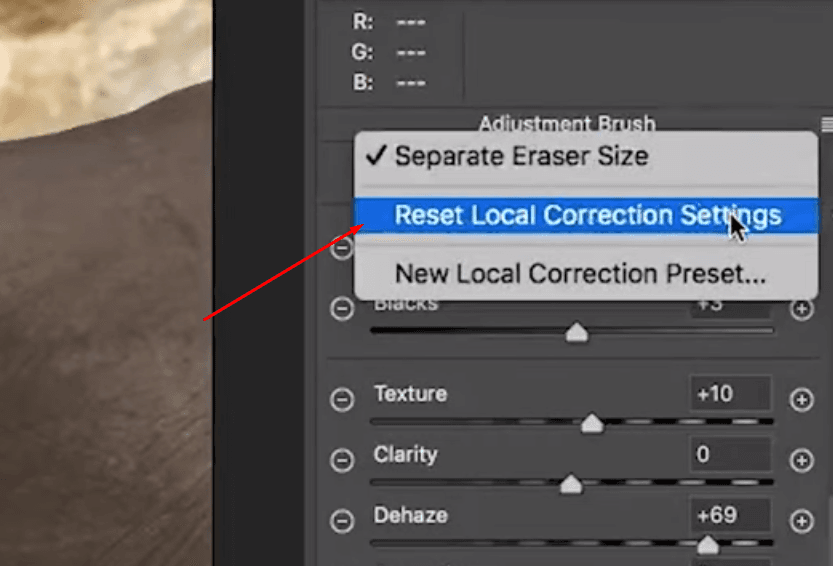
Step 8: Click on the drop-down arrow of “Adjustment Brush” and click on “Reset Local Correction Settings,” to manually adjust the color and brightness of the shadows.
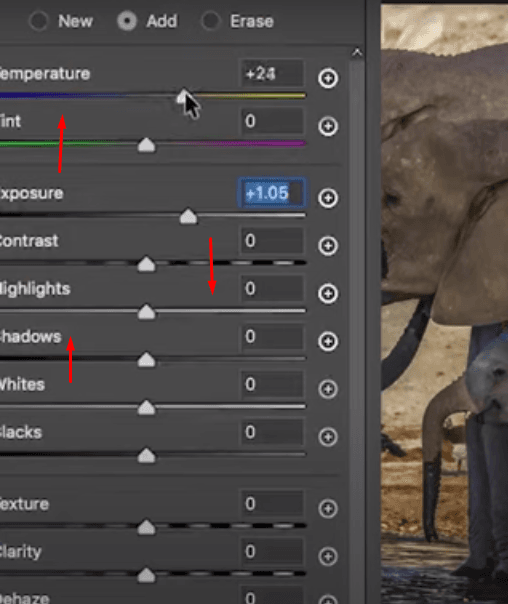
Step 9: Adjust the temperature, highlights, shadows, clarity, texture, and other settings in this dialogue box to achieve your desired color.
Play around with these settings to complete the task of shadow removal.
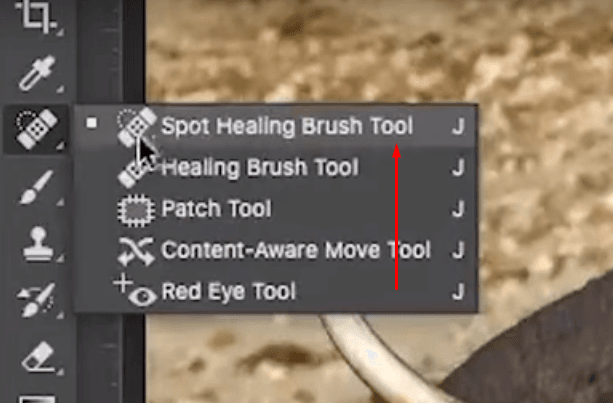
Step 10: Click on “Spot Healing Brush Tool” to fix areas that are not perfect.


Optional: If you want to keep some shadow visibility for depth, you can increase the opacity percentage.
In summary, here are the steps to removing shadows using the “Auto-Mask” tool in Photoshop:
- Open an image.
- Make a duplicate layer.
- Click on “Filter” then “Camera Raw Filter” in the drop-down menu.
- Click on the “Adjustment Brush” icon on the upper toolbar.
- Click on “Mask” at the bottom of the “Adjustment Brush” dialogue box.
- Click on “Auto-Mask” further down the drop-down menu.
- Start brushing over the shadows.
- If the shadows have a color you don’t like or that doesn’t look natural, adjust the brightness and temperature, saturation, and play around with the settings until you reach your desired color.
- If there are affected areas on the image, you can use the “Spot Healing Brush,” to fix the issues.
For more details on this tutorial using the Content-Aware Fill, please watch this YouTube video.
[How to remove SHADOWS from a photo in PHOTOSHOP](https://www.youtube.com/watch?v=qC63rE1UgPc)
Removing Shadows with an RGB Copy
Our last method is using the RGB copy of your image. RGB stands for Red, Green, and Blue, which is a copy of your image best used for digital work. This means if you use your photo for any online purposes, such as for use in a website, e-commerce, or social media, this is the best copy.
RGB images are also great for editing saturation, shading, and vibrancy, as well as changing the light on the screen, which we will be doing to remove shadows from an image of a face in this tutorial.
Here are the steps to removing shadows using an RGB copy of an image:
Step 1: Open an image.
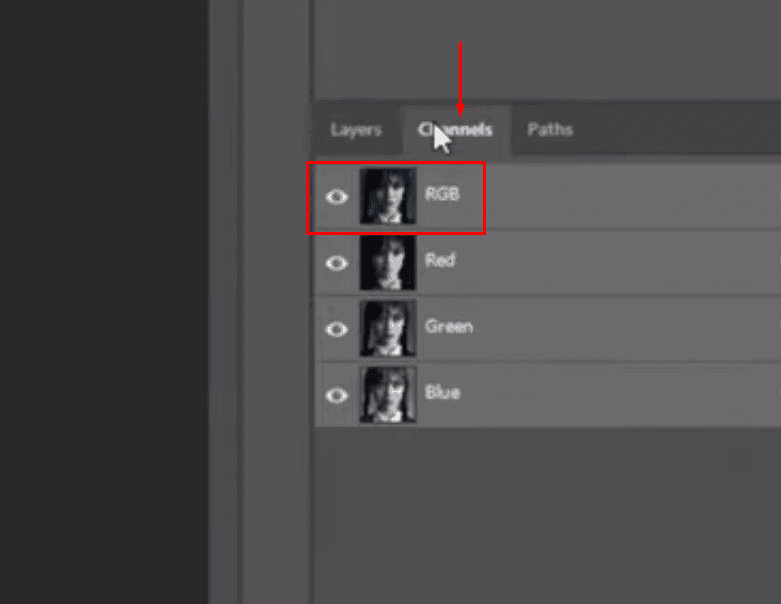
Step 2: Click on “Channels” on the Layers panel found on the right side of the screen. Click on “RGB.”
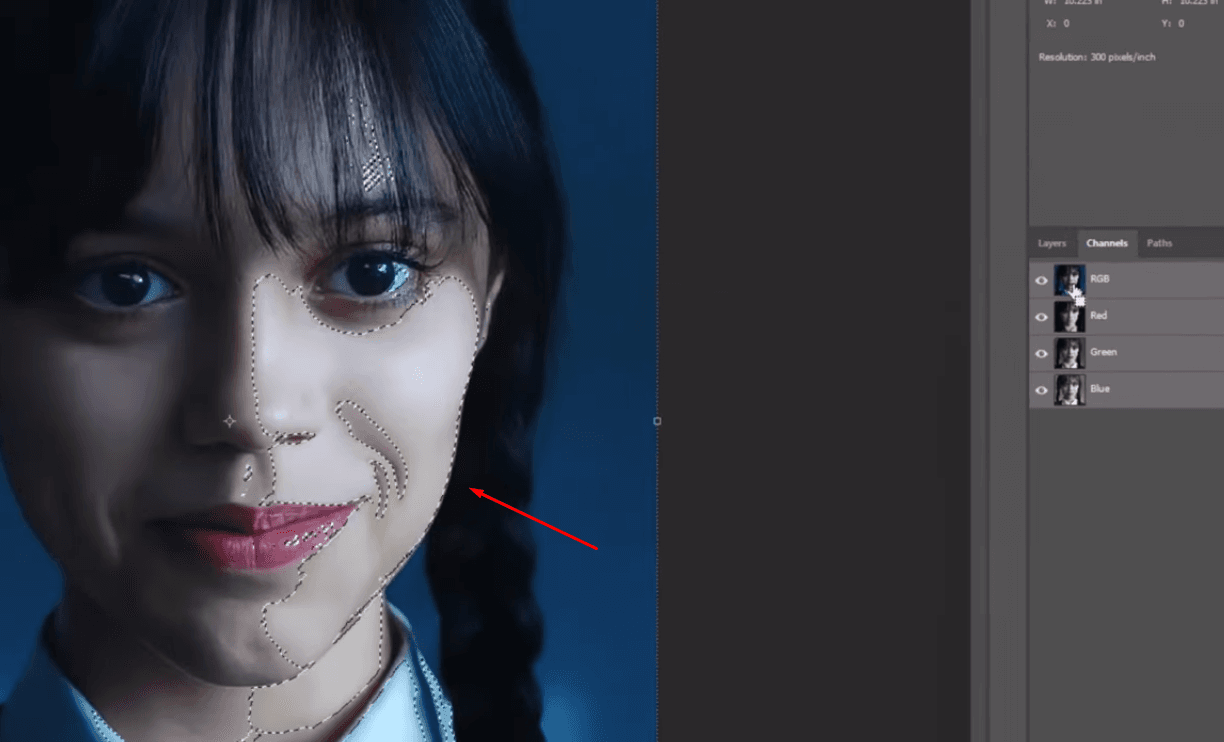
Photoshop will then mark the lightest part of the image, which can be seen in this picture.
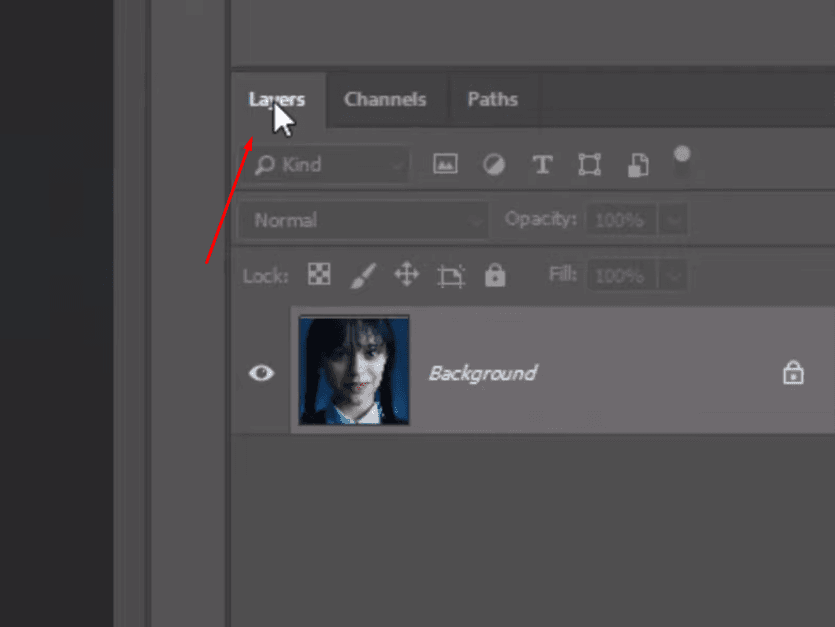
Step 3: Click on “Layers” to create a duplicate of your original image.
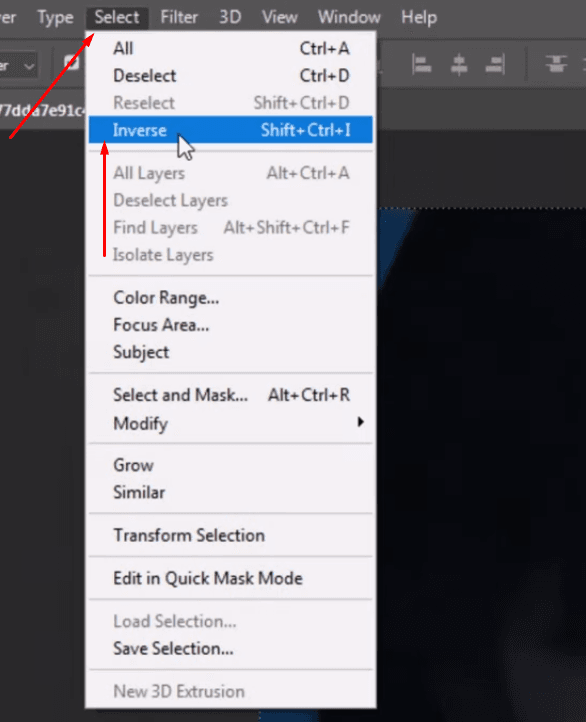
Step 4: Click “Select,” then “Inverse” in the drop-down menu.
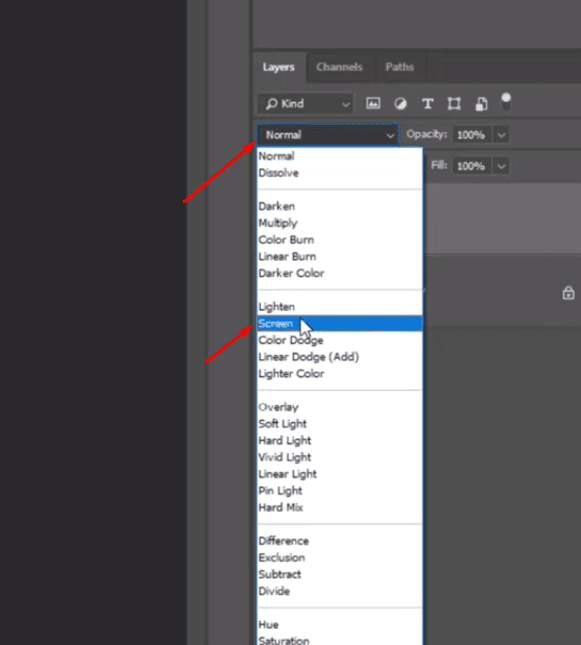
Step 5: Go back to the Layers panel and change the blend mode from “Normal” to “Screen.”
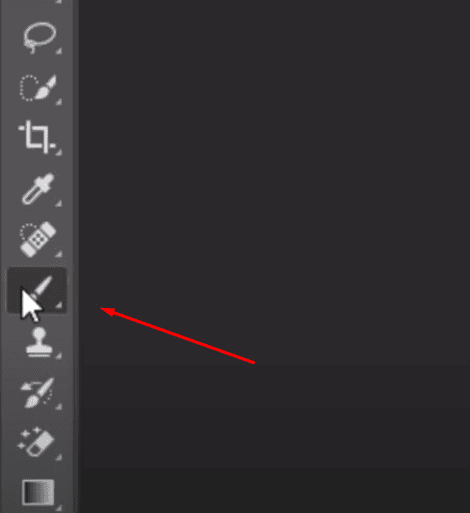
Step 6: Click on the “Brush” tool on the side toolbar.
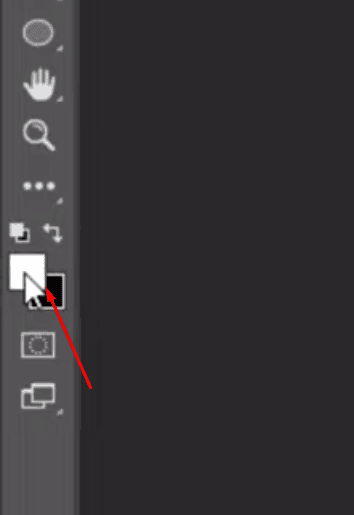
Step 7: Change the foreground color to white.

Step 8: Choose a “Soft Round” brush.

Step 9: Start brushing over the harsh shadows on the face.

Final picture with harsh shadows removed/reduced.
In summary, here are the steps to removing harsh shadows using an RGB copy:
- Open an image.
- Click on “Channels” and click on “RGB.”
- Make a duplicate layer.
- Click on “Select” then “Inverse.”
- Click on “Normal” in the Layers panel and change to “Screen.”
- Click on the “Brush” tool on the left toolbar.
- Change the foreground color to white.
- Choose “Soft Brush.”
- Brush over the harsh shadows to remove.
For a more detailed view of this tutorial, please watch this YouTube video.
How to Remove Harsh Shadows - Photoshop Tutorial
There you have it, four tools in Photoshop to remove different kinds of shadows, from background shadows to harsh shadows on the face, to accidental shadows appearing on an image, this photo editing software has the ability to remove or reduce these imbalances of light and dark in an image.
However, if you’re overwhelmed with all these instructions, we don’t blame you. If you’ve never used Photoshop before, it can be a little intimidating to use. After all, professional graphic artists and photographers primarily use it for their work, so you might be taken aback by all the terms, tools, and technicalities of it all.
That is why we also recommend the simplest, quickest way to remove shadows from an image, and it’s Imagewith.ai, a powerful AI photo editor that does the work in seconds.
Even without any photo editing background, you can have the ability to reduce or remove harsh and severe shadows from any photo, with a few simple clicks.
In the next section of this guide, we’ll introduce you to Imagewith.ai’s Clearoff feature, its amazing tool to remove any unwanted object from an image, including all kinds of different shadows.
The Fastest Way to Remove Shadows in an Image: Imagewith.ai
Wouldn’t it be so much better to upload an image, tap the shadows in a photo, and they all disappear from view? Well, we have some good news for you because there is!
Imagewith.ai is an AI photo editor that utilizes advanced and powerful AI algorithms to remove any unwanted objects from a picture in just seconds!

Simply upload your image, click on “Tap,” and choose the shadows you want to remove, and it’s instantly removed.
Imagewith.ai is a revolutionary AI photo editor that brings you everything you need to edit and upgrade an image in just seconds.
Bringing together three amazing features that can transform any regular image into a high-quality and engaging photo, this photo editor is everything you need, whether you’re a professional photographer or you simply want to have fun with your collection of images.
Imagewith.ai offers the following features:
-
Imagewith.ai Overscale = for enhancing images
-
Imagewith.ai Clearoff = for removing unwanted objects
-
Imagewith.ai Outcut = for removing backgrounds
When it comes to removing shadows from images, we highly recommend the Imagewith.ai Clearoff tool.
Experience the advantage of the cutting-edge feature and elevate your photo editing skills. The Clearoff tool offers superior image retention, streamlined editing workflow, enhanced productivity, and AI-powered precision.
In other words, Imagewith.ai’s Clearoff tool does all the heavy lifting for you, so you can just sit back, relax, and let it remove shadows, remove blurs, watermarks, and any unwanted objects from your image within seconds.
Here is how you can use Imagewith.ai to remove shadows from a picture:
Step 1: Open Imagewith.ai.

Step 2: Click on “Get Started” under the Clearoff section.

Step 3: Upload your image.

Step 4: Click on “Tap” for automatic shadow removal.
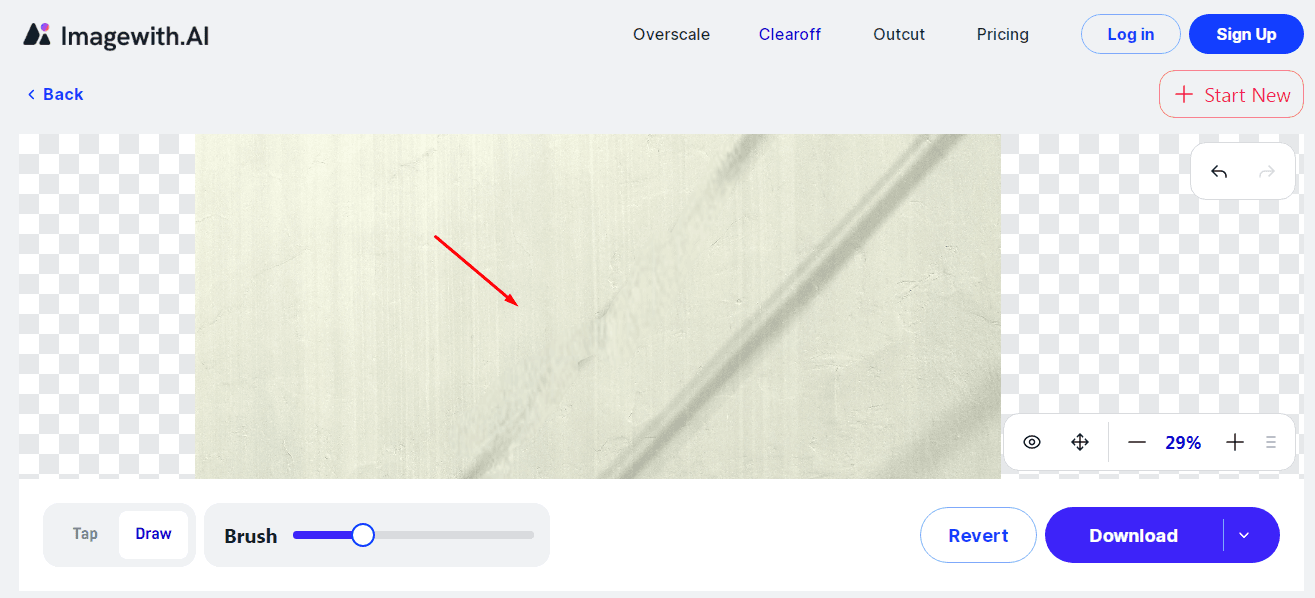
Or, you can also remove the shadow manually for better precision. Click on “Draw” on the lower left side of the screen, zoom in on the shadow, customize your brush size, and manually brush over the shadow.
Once you let go of the cursor, Imagewith.ai will automatically remove the shadow, and it will look like this in the picture above.
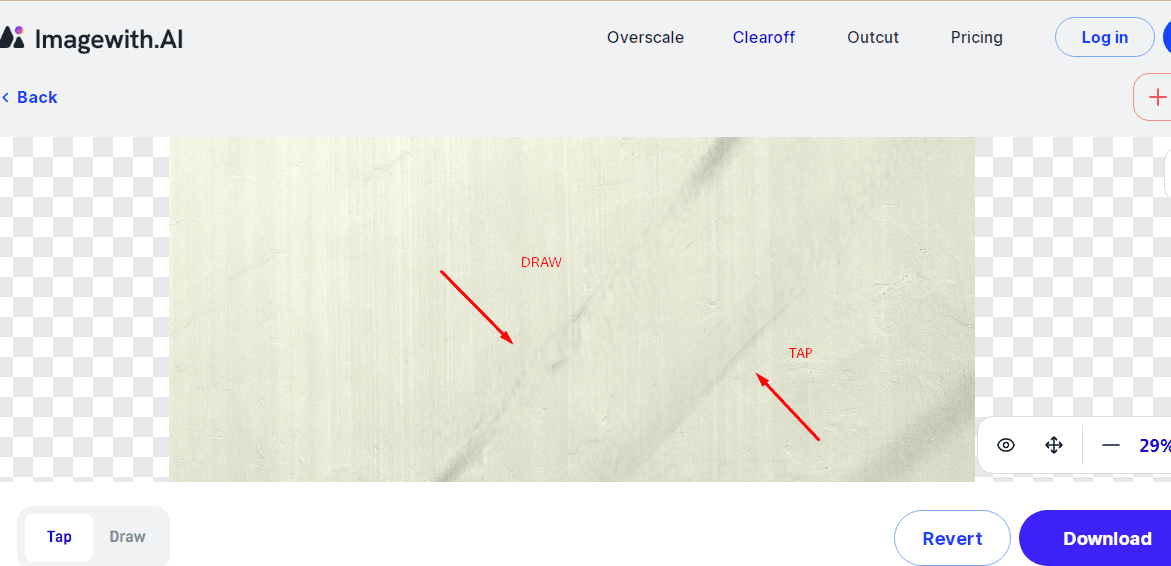
Here is a look at the differences between using the “Draw” feature to manually remove the shadow, versus using the “Tap” feature of the Clearoff tool.
Both features effectively remove the shadow, so using “Tap” or “Draw” will be based on your personal preference.
In summary, here is how you can remove shadows from an image using Imagewith.ai:
- Open Imagewith.ai.
- Click on the Clearoff “Get Started” button.
- Upload an image.
- Click “Tap” for automatic removal of shadows, or “Draw” for manual selection of shadow removal.
Imagewith.ai’s Clearoff tool offers you the simplest, quickest, and easiest way to remove shadows from any image. As you can see, as compared to all the tutorials for Photoshop, Imagewith.ai’s Clearoff feature has the smallest number of steps, without compromising on the quality of results.
Use this powerful AI object remover and reduce your need for manual manipulation of images. Leverage the powerful and cutting-edge AI algorithms of Imagewith.ai to create the most compelling, high-quality, and balanced images you can get from any regular photo.
If you’re looking for tutorials to learn how to remove shadows with Photoshop, the four methods we mentioned here are some of the simplest.
Using the Clone Stamp Tool, the Masking Tool, using an RGB copy, and Content-Aware Fill are just some of the many features of Photoshop that have the capacity to remove unwanted shadows on any photo.
However, these are not the easiest to learn, as you need to have at least some knowledge of the terms, tools, terminologies, and technicalities needed to be able to work with Photoshop.
This is where Imagewith.ai comes in. It is a powerful and revolutionary AI photo editor that makes it possible for beginners and professionals to manipulate images with ease.
With only 3 steps, Imagewith.ai’s Clearoff tool instantly removes any shadow from any image, giving you an elevated photo editing experience like no other.


